Why Details Like Hole Patching Matter More Than You Think
By: Josh Fulfer
Estimated Read Time: 6 Minutes
Homeowners don’t care about foam chemistry. They care about how their concrete looks when you’re done. If your patches blend in, they feel great about the job. If the patches stand out, they question everything—even a perfect lift.
This is why hole patching isn’t just a final step. It’s a sales lever. It shapes reviews, referrals, and price tolerance. We’ve already shown how smaller holes help you win work—see Why 3/8″ Drill Bits Win Jobs in Concrete Lifting. The other half of the story is how you finish those holes.
Patching = Perception
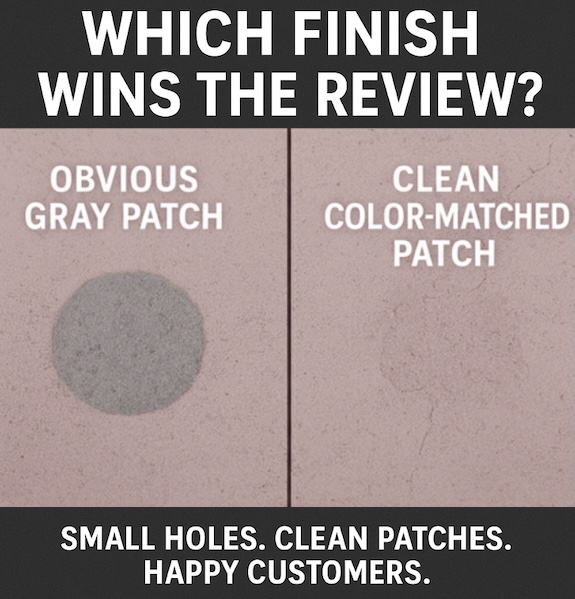
Most customers hire you once. They form an opinion fast. The last thing they see is the first thing they remember. You can lift a slab perfectly and clean the site, but if the patches read like gray dots on a stamped patio, that’s the headline they share with neighbors: “It works… but look at the marks.”
Flip that script. When the patch blends, the story becomes: “It looks like new.” That line shows up in reviews. It builds trust. It lowers price friction on the next estimate. It sets you apart from low-bid contractors who rush the finish.
Every Jobsite Is a Billboard
Your work sits in public view: driveways, sidewalks, entries, patios. Neighbors walk by. Guests park on it. Photos get texted and posted. Clean, blended patches market you for free. Sloppy patches cost you quietly—lost referrals you’ll never hear about.
Smaller holes help (again, see the 3/8″ article above). But the patch is where you earn the “wow.” It’s where a good job becomes a great one.
Reviews and Referrals Live in the Details
Read your 5-star reviews. Customers rarely mention density or machine specs. They say things like, “They cleaned up everything,” and “You can hardly tell where they drilled.” That’s not luck. That’s process. And process gets repeatable results—on jobs and in marketing.
Professionalism Commands Higher Prices
People pay more when they trust you respect their property. A clean finish signals care, craftsmanship, and consistency. It tells the buyer, “We think about what you care about,” which is the fastest path to premium pricing without pushback.
Not Matching Colored Concrete Yet? Easy Ways to Start
If you’re not currently color matching, here are simple, low-cost options that level up your finish right away:
1) Add pigment to your patch mix. Keep a small kit of colorants in the truck. Dry powders like Davis Colors Powder Pigments or liquid packs like Quikrete’s Liquid Cement Color let you tone your non-shrink grout or patch mix toward the slab color. Note: most colors dry a shade lighter than they look when wet—aim a touch darker in the mix.
2) Top-dust the surface. While the patch is still plastic, you can dust a bit of dry powder on top and tap it in with a sponge or trowel. This helps the surface tone meet the eye and can blend minor shade differences.
3) Save the drill dust. When you core into colored/stamped concrete, collect some dust. Sprinkling it onto the wet patch can nudge the match for free—and it often blends surprisingly well, especially on weathered slabs.
4) Match sheen with a light sealer or stain. If the slab is sealed or tinted, a light touch of compatible sealer or stain over the cured patch helps match gloss and depth. Go light. You’re blending, not painting. Test first in an inconspicuous spot.
5) Imitate texture. On stamped surfaces, a quick texture tap can help. Use a skin, sponge, or even a crumpled plastic/foil press to echo nearby texture so the patch doesn’t read as “flat” against a patterned field.
None of this requires a huge spend. It requires intention and a simple kit you keep stocked. Even getting “close” beats a plain gray dot on a decorative patio.
A Simple, Repeatable Patching SOP
Your finish improves most when it’s systemized. Here’s a clean, 7-step outline you can adapt for your crews:
Step 1: Drill clean, tight holes (prefer 3/8″ where the scope allows) and place holes along grout lines when possible.
Step 2: Collect a small amount of drill dust if the slab is colored/stamped.
Step 3: Mix patch: non-shrink grout or approved patch compound + pigment (dry or liquid) to get close to the surrounding tone.
Step 4: Place the patch slightly proud; finish flush with a tight edge and clean perimeter.
Step 5: If needed, dust the surface with color powder and tap in; imitate nearby texture.
Step 6: After cure, apply a light sealer or stain touch if the slab has gloss/tint (test first).
Step 7: Final wipe-down, wide photo, and close-up photo of each patch.
Those last two photos are gold. They sell your next job.
Train It. Film It. Scale It.
Good finish work is a habit. Build it with training and short videos your team can watch on repeat. Record a few jobs. Show the mix, the top-dust, the texture tap, and the final wipe. Keep clips short and to the point.
We’ve laid out a simple system for capturing and organizing job media—use it to build a training library and reassure buyers before they book: Photo & Video Systems for Concrete Lifting. Film once. Reuse often. Train techs, and educate customers at the same time.
Turn Patching Into a Sales Advantage
Once your crew nails the finish, talk about it everywhere:
On estimates: “We use smaller holes when the scope allows and patch them cleanly. On most jobs you’ll barely notice where we drilled.” That one sentence lowers fear and wins work—especially on stamped or decorative surfaces.
On your website: Create a small “Our Finish” section with two or three close-up patch photos and a short explanation of your process. Link from your concrete lifting page and your gallery. Consider a short 45–60 second video that walks through your finish steps.
On Google Business: Post one or two patch close-ups monthly (driveway, sidewalk, stamped patio). Use captions that call out the blend: “3/8″ holes placed on grout lines—finished with color-matched patch for a clean look.” Those images speak louder than foam specs.
In follow-ups: Drop a before/after and a patch close-up in your post-estimate email. People buy with their eyes. Show them what “good” looks like.
Handling Expectations (and Edge Cases)
Be honest: older slabs fade, weather, and vary from panel to panel. A perfect match isn’t always possible—and it doesn’t need to be. Set expectations up front: “We color-match and blend for a clean, low-visibility finish. On older or sun-faded slabs, it may cure a shade lighter. We’ll get it close.”
That line builds trust. It also protects your crew from endless “one more tweak” requests when the slab itself is inconsistent.
Quick Resource List
Keep a simple color kit in each truck:
• Dry color powders (e.g., Davis Colors Powder Pigments or )
• Liquid pigment packs (e.g., Quikrete Liquid Cement Color—charcoal, brown, red)
• Non-shrink grout / approved patch compound
• Small texture skin or sponge for stamped surfaces
• Light sealer for sheen matching (use compatible products; test first)
Tip: most pigments dry lighter. Mix a hair darker than you think you need. If unsure, make a tiny test patch on scrap or in an inconspicuous spot.
Bottom Line
Details decide who wins the job. Drill bit size. Hole placement. And the patch. These aren’t small things to the customer—they’re the only things they can see.
When you blend your patches, you earn trust. Trust gets reviews. Reviews get referrals. Referrals raise your close rate and support premium pricing. That’s how finish work becomes a growth system, not an extra step.
Train it. Film it. Show it. Then let your work sell the next job while you’re driving to it.